Thursday, May 21, 2015

Confetti Salsa Fresca

Hola amigos!  So it's been a very busy spring in my corner of the world.  My husband and I recently had an amazing opportunity to travel to Puerto Vallarta, Mexico for a romantic weekend away.  It was seriously amazing!!  Did I say that already?  Well, it was that awesome.  Since it's only a 2-hour flight from where we live, we could kick ourselves for not visiting sooner.  A Texas size "muchas gracias" goes out to the staff at the Grand Velas Resort and outdoor adventure crew at Vallarta Adventures who made our stay incredibly enjoyable.      
                      

After a bucket list worthy outdoor adventure of speedboat ride across ocean, mule riding up the mountain, zip-lining through the jungle, and rappelling down a waterfall, we enjoyed a light lunch of quesadillas, guacamole, and salad made by a sweet little lady who didn't speak a lick of English.  Luckily we were able to use our basic Spanish to order our food.  It was perfectly simple and absolutely delicious.  The salad was similar to a fresh salsa like pico de gallo but reminded me of colorful confetti so I named my version Confetti Salsa Fresca.


The vegetables were chopped finely enough (but not too small) so that you could easily scoop up a nice portion on a tortilla chip.  Topping the quesadilla with a little guacamole and the fresh salsa was the perfect combination.  Here's the printable recipe:


The version below is easier to read from blog page if you are ready to try recipe but not ready to print it out.  

Confetti Salsa Fresca
1 Carrot, shredded
1 English cucumber, medium-finely cubed
3 Roma tomatoes, medium-finely cubed
2 Green onions, finely sliced
1 Small lime, juiced
Seasoning: 1 teaspoon Tajin (classico)

Prepare vegetables then add lime juice and seasoning.  Stir to combine.  Serve as a condiment with your favorite Mexican foods or enjoy as a fresh salsa with tortilla chips.


Tajin Clasico is an all-natural mild seasoning blend of chilies, lime juice, and sea salt which is very popular in Mexico.  It's commonly sprinkled on fruits and veggies.  It can also be used to rim the glass for special margaritas or other mixed drinks.  Check it out at tajin.com.  


Plan a night to make a simple Mexican meal and include this yummy Confetti Salsa Fresca.  Don't forget to blend up a pitcher of delicious frozen margaritas.  Salud!


Wednesday, April 22, 2015

Weekly Menu Board

Hey there - have you had a chance to check out the post on my new Kitchen Command Center (KCC)?  The original design included a quick reference folder, a magnetic bin for shopping lists/notepads, and a magnetic bin for our takeout menus folder and family reference folder.  That was actually supposed to be it but I got to thinking....which can sometimes get me into trouble!  But not this time.  My KCC seemed incomplete somehow so I added a menu board to help organize our weekly meal planning.                        
          
There are myriad examples of menu boards on Pinterest so there's bound to be one that will meet your needs.  I wanted something simple, compact, and magnetic.  I already had most supplies on hand including the square linen canvas, ribbon, and several clothespins so that was my jumping off point.  


Here are the supplies I used to create the Weekly Menu Board:

12 x 12 linen or burlap covered canvas

hot glue
ribbon
natural clothespins
scrapbook paper
small black letter stickers 
full sheet label paper
chalkboard tag
small kraft sacks
chalkboard stickers
chalk & chalk pen
super strong magnets (3)


First, I glued the black grosgrain ribbon equal distance from outside edge leaving 2" of canvas showing.  


Before gluing the remaining components (clothespins, chalkboard header, and sacks to hold meal option tags), I did a "dry fit" to make sure I had the spacing right before actually gluing.    


I then created the chalkboard header and chalkboard stickers using the same technique I used in my glass chalkboard post.  I printed off desired words and images. Rubbed back generously with regular chalk.  Placed word or image on front of chalkboard and traced with pen.  I then traced with chalkboard marker, allowed to dry, and then lightly rubbed entire area with chalk.  


I created my meal option tags in my "Pages" app on my iPad using a chart (but skipping every other space).  I printed this off on a full sheet of label paper and cut out each label using my paper cutter.  I also cut out several pieces of scrapbook paper (1" x 4") attaching  meal option labels to each piece.  You could also print directly onto your scrapbook paper.  I also plan to laminate these tags for longevity.    


The addition of the Weekly Menu Board was the finishing touch I was looking for to complete our Kitchen Command Center.  I've already noticed our boys getting more involved choosing meals for the week.  I think it's important to empower kids to make healthy food choices.  What better way than involving them in choosing and preparing meals.  Cooking and eating should be a multisensory experience.  

Shopping for fresh ingredients at your local grocery store, farmer's market, or even picking fresh berries or corn at a local farm can be a fun outing.  As a young girl, I have great memories of picking and shucking fresh corn.  As toddlers, my boys loved visiting our local berry patch and could not resist sampling the yummy produce. 

I hope this post inspires you to create a menu board that will encourage your family  to make meal planning a fun, multisensory experience.  

Monday, April 20, 2015

Kitchen Command Center

I have a dirty messy little secret (and I'm not alone). Based on what I've seen at the homes of family and friends, many of you share my tendency for hanging myriad items on the refrigerator. You know the kind of countless items I'm talking about.  Here's a partial list of things on the side of my frig - photos, children's art, recipes, school info, camp info, group exercise schedule, kid's sports schedules, magnets, graded papers, report cards, magnetic bins, highlighters, business cards, box tops, and a school phone directory.  It's a complete mess!!  I wince and look away each time I glance at it (which is multiple times per day) promising myself I will work on this one of these days.  Well, enough procrastinating!  I am bound and determined to make sense of this cringe-worthy chaos.  Today is the big day...                                           


Wondering just how messy this area was before I got to work organizing everything?


First things first, I removed everything and wiped the area with cleaner.  Nothing like a clean slate... It already looks better!


 I sorted through the mess seemingly important items.  Most items ended up being recycled, shredded, trashed, or relocated because all kinds of "papers" dominated the clutter I removed.  Only a few important papers will come back because I refer to them on a regular basis.  I found the perfect solution to keep papers not only neat but easy to access (and update a needed) - clear front presentation folders with 3-rings brads as well as page protectors.  These are inexpensive and readily available at office supply stores (and even the grocery store).  You may already have something you can use in your stash of school or office supplies.


I attached magnetic strips to back of quick reference folder with hot glue.  I then placed several page protectors in the folder securing with brads.  I printed "Quick Reference" on an 8.5" x 11" piece of scrapbook paper and placed it in first page.  Papers I will include in my quick reference folder will be the group exercise class schedule, school calendar, sports/game schedules, cooking measurements conversion chart, and important phone numbers (for caregivers).  I have additional empty page protectors for any new papers that I deem worthy of the quick reference folder.  My litmus test - if I don't look at a paper on at least a weekly basis it doesn't go in the quick reference folder.

I have one magnetic bin for pre-printed grocery shopping lists and blank note pads.


I have a second magnetic bin for a takeout menus folder and a family reference folder (both folders are same style as quick reference).


Our family folder includes papers that I refer to occasionally (on a biweekly, monthly, or quarterly basis):
School - class schedules for each child, login IDs/passwords for district websites to check grades/assignments, teacher contact info
Sports - roster with contact info 
Church - volunteer schedule/duties, small group contact info
Neighborhood - contact list
Gym/YMCA - family member login and account pin


For most families, the kitchen is the heart of the home.  Since we spend a lot of time in the kitchen area and we have a refrigerator, why not make it a multifunctional appliance. It's a logical place for locating your kitchen command center (preferably on the side).  I seem to do more planning in the kitchen than any other room so it's nice having my shopping list and notepads handy.  I can also quickly peruse my takeout menus on those nights when I don't feel like cooking.  This system is super flexible - if you notice that you are referring to papers in your family folder more often than expected, you can easily move those papers to your quick reference folder.     


This project was a snap and I don't know why I put it off for so long.  It can easily be personalized with different folders and scrapbook paper that coordinates with your decor.  I found my mesh bins (with magnets on back) and chalkboard clips at HomeGoods.  You could likely find everything you need at the dollar store.  I hope this post inspires you to create your own unique kitchen command center.  I feel more productive already!!   

Tuesday, March 24, 2015

Springtime Monogram Wreath

So my front entrance has been needing a little sprucing up. The empty flower pots and and blank door weren't doing much to welcome friends and family much less visitors.  So I picked up some new plants - white caladiums, purple Mexican heather, and lime green ipomoea vine - to freshen the flower pots.  I love the combination of dark green and lime green with the pop of purple! 
        

My Inspiration


This inspired me to embellish my existing door wreath with a fresh springtime theme.  I started this project with the oval grapvine wreath and decoupaged "H" which I previously used as a door decor.  I found everything I needed at Hobby Lobby to embellish it for spring.

  
Supplies needed:

- oval grapvine wreath (approimately 22" long x 16" wide)
- wooden monogram (my "H" is 9.5" tall and 9" wide that decoupaged in a white/black diamond wrapping paper
- 2.5" embroidered dragonfly ribbon
- 1.5" lime green textured ribbon
- florist wire for making and securing bow to wreath
- clock face knob
- dragonfly embellishment
- twine to tie dragonfly to knob post


I initially layered the textured green over the dragonfly ribbon but it  looked too heavy.  I loosely wrapped the lime green ribbon around the wreath to add color and texture.   I tied a loop of twine around draponfly embellishment then attached to post of knob behind face of knob.  To secure knob in place, I placed a washer over post and then tightened the nut in place.  


Lastly, I attached the dragonfly ribbon bow at the top against the knob.  The metal dragonfly dangles below bow and just above the letter.  


The embroidered dragonfly ribbon was a little pricey ($12.50 a roll at 50% off) but it's my favorite part of the wreath and brought the whole project together.  Look no further than your yard (or front porch), it just may inspire your next project.


Happy Spring!  

Tuesday, March 17, 2015

Wicker Chest Transformation

Many moons ago, my husband and I purchased a pair of wood-toned wicker chests at Pier 1 Imports.  It was one of our first "big" furniture purchases as a newly married couple. We needed something that would function as a bedside table but also offer storage for clothes.  Although we have since upgraded our bedroom furniture, I've held onto these chests for years.  They are still in excellent condition except for the outdated finish.  More than past due for a much-needed makeover, I transformed them with a black satin stain and new ceramic knobs.                    
      

Here is the "after" picture showing the transformation.  This chest sits in my guest bedroom flanked by twin beds.  The other chest will find a home in my office/studio.  So, are you curious about the "before"?  


Pretty amazing, right?  It's hard for me to believe my new and improved chests started out like this.  The transformation process is easier than you might think.    


I transferred the chest to my garage to give me a large ventilated work area.  After wiping the chests down with cotton cloth (no waxy or oily cleaner) to remove any dust, I removed drawers and drawer handles.  I lightly sanded the wood accents to removed any remaining varnish and dusted again with tack cloth.  Using a foam brush, I covered the body of the chest (front and sides) and drawer fronts with Minwax Polyshades in Satin Black.   


After allowing it to completely dry (24-48 hrs), I lightly sanded wood edging on the drawer fronts and body of chest to give it a slightly distressed look.  Use a fresh tack cloth to removed any dust from sanding. I then inserted the new ceramic knobs in the existing hole.  


Do you have an old chest sitting around just waiting for a makeover?  Give it a new and improved life by simply changing the finish with a two in one stain and new knobs. Check out Hobby Lobby and World Market for a variety of interesting knobs.  It's a project you can easily complete in a weekend to renew your uniquely nested home.   

Wednesday, March 11, 2015

Family Command Center

           
For those of us who live in the states, this is the first official week of Daylight Savings Time (DST).  Depending on who you ask, people either love or hate this yearly ritual of moving our clocks ahead one hour each spring.  For some people, the loss of that one little hour of sleep wrecks havoc on their circadian rhythm. Even though this process is supposedly harder on night owls like me, I would keep our clocks on perpetual forward because I enjoy having more hours of sunshine and I hate that it gets dark at five o'clock when we "fall back" one hour in November. Given that I'm in favor of "spring forward", I dutifully (and eagerly) moved our clocks   ahead one hour anticipating longer days filled with sunshine and warmth. Goodbye winter!  Oh how I look forward to the sunny   days and warmer temps - the humidity, not so much. Boy does it do a number on my hair!  Unfortunately, it happens to be a very cloud-filled day in my neck of the woods so I'll have to wait a little longer for those sunshiny days.  No worries - a day indoors gives me a great opportunity to share an organizing project I completed in early February - our Family Command Center.


As a busy family of four (five if you include the dog), I generally keep track of our hectic schedules of sports, school, travel, and work on my iPhone calender.  It works beautifully if I remember to input the event.  Being a very visual hands-on person, I really missed having a calendar on the wall which the whole family could easily refer to and quickly add events.  I also wanted a spot where I could display party invitations, upcoming appointment reminders, photos, and school notices.  So that was the inspiration for this project.

Our Family Command Center includes three components:  
  • Burlap Memo Board
  • Two-month Perpetual Calendar
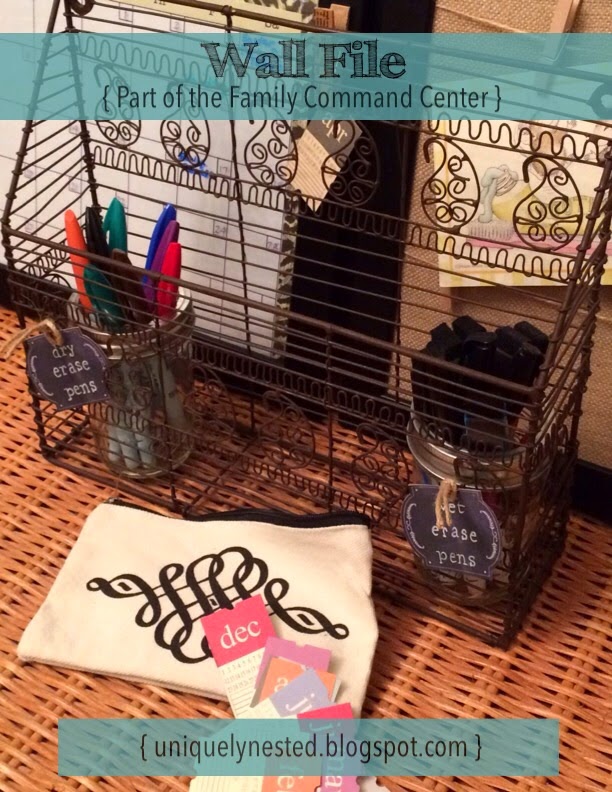
  • Wall File

Here's how it looks hanging on the wall. It's a convenient location for us because it's very accessible in a short "hallway" as we enter the house from the garage.  I walk past it mutiple times per day so it's easy to add or check monthly events.  

Back in October, I created the Burlap Memo Board using a standard picture frame (14" x 18") and a burlap covered canvas (12" x 16").  Although originally turned in a landscape position, I turned the memo board in a portrait position to match the calendar for this project.


For the Two-Month Perpetual Calendar, I used the same style picture frame (14" x 18") as the memo board.  I removed backing and covered it with a leopard print wrapping paper I had on hand.  You could use any wrapping paper (small scale pattern works best) or even a light weight fabric.  I liked how the leopard pattern coordinated with my existing decor.  I printed two blank calendars onto white card stock trimming to edge of calendar.  I positioned calendars on top of covered backing adhering with scrapbook adhesive.  You could even use a fun washi tape.  I cleaned the protective glass and reinserted the now calendar-covered backing.  Using a wet erase marker (which come in a wide variety of colors) to write directly onto the glass front, I filled in the dates for those two particular months.  I prefer using wet erase markers versus dry erase because they don't easily smear. To indicate the months, I hot glued a decorative clothespin to top left edge of frame (for top calendar) and glued another decorative clothespin to middle edge of frame (for bottom calendar).  I found cute month tags in the scrapbooking section.


To hang the the calendar and memo board, I attached decorative hooks to the wall.  For "hangers" on the picture frames, I tied a length of decorative rope to each frame.  The rope hanger easily slips onto the wall hook and you can just as easily remove the calendar for updating events.


For the Wall File, I used an inexpensive horizontal wall file which I centered below the calendar and memo board.  The "file" holds two small glass jars (one for wet erase markers and one for dry erase markers) and a cute zippered pouch for the month of the year tags.


The great thing about this project is that you can easily find the supplies at your local craft store.  You can also choose a fun paper or fabric backing and unique frame to personalize your project. My frames are black in a clean simple style.  You may want to use intricately carved frames or even reclaimed wood frames.  The  possibilities are endless.  I could easily see the project in a teen girl's room to coordinate with her bedding and decor.


Cute little monthly tags and decorative clothespins can be found in the scrapbooking section of your local craft store.  If I had space I would actually do three frames - two perpetual calenders with the memo board in the middle or the reverse with two memo boards on the outside with one perpetual calendar in the middle.  


Similar calendar systems can be purchased at stores like Ballard Designs and Pottery Barn but they cost an arm and a leg.  I've actually drooled over said systems as I purused the glossy pages of my PB catalog.  The burlap message board (15' x 20') from Ballard cost a whopping $49.  My Burlap Memo Board is slightly smaller but cost roughly $15 to make because I found my frames and burlap canvas on sale.  For the Daily System by Pottery Barn, it would cost over $200 for a system like the one I created. My family command center cost less than $50.  I don't know about you but I like the idea of saving $150.  


Check your local craft stores for sales on picture frames and the burlap canvas. Michaels and Hobby Lobby always have a 40% off coupon out there as well.  I found my wall file in a clearance section.  It's a fun and easy project to complete. It cost nothing to study catalogs, magazines, and Pinterest for inspiration.  I just wasn't willing to give up any appendages or take out a loan to create a command center that worked for our family.  I created ours for a fraction of the cost.  You can too!        

Saturday, March 7, 2015

Flora & Fauna Spring Tablescape

I mentioned a few days ago that I've got a serious case of Spring Fever.  I'll take that any day over flu and pneumonia - thank you very much!  The "fever" started with my Simple Spring Mantel then progressed to the Moss Ball Topiaries.  It's now moved into the dining room as I freshened up my table with a Flora & Fauna Spring Tablescape.  
                                                          

The foundation of my display is the same Turkish dough riser which you may remember from my holiday tablescape. Although the potted silk daffodils remained in the same spot, I removed the large white candles.  I filled the middle two sections and outer two sections with additional beans to raise up my decorative items.  I covered the "filler" with multi-colored shred which I found in Easter section at World Market.  


The natural shred provides a great texture and the perfect mix of springtime colors including cream, brown, citrusy green, and duck egg blue.  For the "flora" part of the tablescape, I paired the silk daffodils in cream and the moss ball topiary.


For the "fauna" part of my tablescape, I found natural fiber birds and bunnies at World Market.  The bunnies are especially sweet.  These little cuties come in both cream and tan.  I also added small silk butterflies to the mix with one large butterfly in the middle section. 


Here are the sources for my spring tablescape:

Turkish dough riser - Old World Antieks, Store in La Grange, Texas and vendor at Round Top Antique Show 

Potted silk daffodils - Target (found at Christmas a few years ago)

Moss ball topiary - created by me (check out the post for this project) 

Natural multicolored shred, fiber birds, fiber bunnies, and egg-filled nests - World Market

Butterflies, bird cage candle holder - Michaels 

Beans (filler for sections) - grocery store  

Wine corks (filler around potted daffodils) - recycled  


And Spring arose on the garden fair, Like the Spirit of Love felt eveywhere; And each flower and herb on on Earth's dark breast  rose from the dreams of its wintry rest.
- Percy Bysshe Shelley