Monday, September 28, 2015

A Trio of Halloween Topiary

So the Halloween decorating continues with cute and creepy topiaries.  I've come up with three different options for modifying the topiaries I created in the spring.


Witch Hat Topiary


For Witch Hat Topiary - Simply add a painted and glittered paper mache witch hat to the moss ball and tie a bow around top of distressed clay pot (or under moss ball for tall topiary).


Spidery Topiary
I converted my tall topiaries into spider topiaries by adding 2-3 glow in the dark spiders to the moss ball and ribbon bow just below moss ball.  Super simple!!


Skull Topiary
I removed the moss ball and replaced it with a foam skull (which I found in Halloween area at Michael's).  I wrapped post in black ribbon ending with a bow under skull.  


Friday, September 25, 2015

See-Hear-Speak-No-Evil Pumpkins

I'll admit that I'm going a little overboard with Halloween this year but the ideas just keep coming so I keep going.  I must give my younger son credit for the idea part of this next craft.  He has a book mark with three frogs positioned with their hands over their eyes, ears, and mouth based on the original Japanese pictorial maxim, Three Wise Monkeys.  
The monkeys embody the proverbial principle "see no evil, hear no evil, speak no evil".  So basically the monkeys (or pumpkins in our case) are instructing us to be of good mind, speech, and action.  I think that's pretty good advice.  My son thought it would be cool and funny to showcase pumpkins that way for Halloween.  I couldn't agree more!

Craft Items Needed:
  • 3 faux or real pumpkins (about the same size)
  • 3 faux sticky back mustaches (found mine at Target) or you could draw it directly onto pumpkin with Sharpie marker
  • 3 pairs of google eyes (whatever size you like - I kinda wish I'd used bigger eyes)
  • 3 pairs of bony hands (I used hands from 3 small bag 'o bones I purchased at Michael's in Halloween area)
  • hot glue

Directions:
  • Hot glue eyes and place (or draw) mustaches on pumpkins for "face"

  • See No Evil Pumpkin - hot glue hands as if they are covering the eyes

  • Hear No Evil Pumpkin - hot glue hands on sides of pumpkins as if they are covering invisible ears

  • Speak No Evil Pumpkin - hot glue hands at an angle as if covering the mouth

Place pumpkins together for a funny albeit wise reminder of how we should behave anytime of year but especially at Halloween with all the spooks that are out and about.


Wednesday, September 23, 2015

Polka Dot Pumpkins

Are you getting into decorating for Halloween as much as me?  I'm in the process of creating displays for both my entry table and adjacent dining room.  Can you guess what the highlight of both areas is?  It's sparkly and spotted but you won't find in nature.  It's Polka Dot Pumpkins!


I purchased a few small faux cream-colored pumpkins at Michael's and decided to try my hand as creating polka dots for a fun and whimsical design.  You can find faux pumpkins at any craft store.  You may even have faux pumpkins left over from last year which you could paint the base cream color before adding the polka dots.  I decided on a black and cream theme (with pops of orange) for these areas so black polka dots were an obvious choice.  Because I have solid black glitter pumpkins which go with the polka dot pumpkins, I made my dots glittery as well.


Here's how to get your polka dot on:

BEFORE 
  • Pour a little bit of black paint onto a small paper plate.  Using a foam pouncer (from Martha Stewart crafts), dip evenly into paint and press onto pumpkin.  Lift pouncer and check that dot is covered fully with enough paint.
  • Gently sprinkle wet paint with course glitter (Martha Stewart crafts) in crystal.  Tap to remove any excess glitter.  I did this step over large baking sheet to collect glitter.
  • Continue to randomly place painted polka dots around pumpkin and adding glitter as you go.  You can probably do up to 3 dots at a time before adding glitter but you don't want paint to dry too much before adding glitter.
  • Be careful where you put your fingers as you place dots.  It gets a little tricky as you continue to add dots.  You don't want to smudge previously painted dots.  If this happens (which it did to me a few times - grrr), just get a damp paper towel and wipe off your mistake.  Replace dot you removed with a new smudge-free glitter dot.
  • Last but not least - paint stem with black paint and add glitter.  Let the painted polka dots dry.  


This project is very forgiving.  If you mess up or smudge a dot, just wipe if off and start over.


Monogrammed Version:
  • IMPORTANT - Start with monogram first if you are choosing this style polka dot pumpkin.
  • I placed a large lower case sticker onto pumpkin.  I did not add any additional heavy duty adhesive to sticker back but would consider it for next time.  I noticed the edges seemed to come up a little because of the curve of the pumpkin which bothered me.  I'm a little OCD that way :-/
  • Carefully paint letter with Mod Podge.  Sprinkle with course glitter.  I used the smallest foam pouncer (which is just a little larger than a pencil eraser) to place a dot on either side of letter.  It gives the letter definition.
  • Begin placing dots as described above.  

Here's a sneak peek (pictures below) of a polka dot pumpkin on my entry way table and dining table.  That's all on that for now... look for an upcoming post so you can see finished design.


This simple (yet spooktacular) craft is incredibly easy, a little messy (you know how glitter gets everywhere) but oh so eye-catching and impactful for a Halloween design.  I hope you'll give it a try.  I'm actually thinking of making a few more painted pumpkins with orange dots (for general fall decor/Thanksgiving) as well as striped ones in black or orange.  You could even paint on just the Mod Podge in dots or stripes and cover in a clear glitter (for a tone on tone look) or colored glitter to give it a pop.


The Polka Dot Pumpkins only require only 4 items (which you may already have on hand) - faux pumpkins, black craft paint, foam pouncer set and course glitter.  I currently have them in my entry way, dining room, and one in my powder room (more on that later).  I'm thinking of creating a few more for my kitchen island and window.  Where will you put your Polka Dot Pumpkins?

Tuesday, September 22, 2015

Bewitching Halloween Vignette

I mentioned in my previous post that I'm helping host a fundraiser in October in support of The Breast Cancer Research Foundation.  The theme (which my very creative sister came up with) is Pink Potions - A Witch's Brew.  All the ladies in attendance will be dressed in their witchy best.  I've designed a Bewitching Halloween Vignette over my piano which we will use the night of our event.


To set the stage for a modern day witch's lair, I started with a large white framed chalkboard embellished with words from Shakespeare's Song of the Witches (from Macbeth).  Check out my Framed Glass Chalkboard post for step by step instructions on how to create chalk art.


I wanted to add lidded apothecary jars but they were just too pricey at $24 a pop.  That would have blown my whole budget!  I used three open topped glass cylinder jars ($5 each) instead which saved me a wicked amount of money.  You may already have some glass jars around the house which you can repurpose.  It could be any glass jar - recycled spaghetti sauce or other large jar. 


My tall glass jars hold eyeballs (eyeball-looking bouncy balls), large plastic cockroaches, and skeleton bones.  You could do any creepy thing - snakes, other bugs, skulls, spiders, etc.  I found all the stuff I needed at Michael's.  Although I used bouncy balls for the eyes, you could use small styrofoam balls painted white with black center and red veins.


I also added clear jars full of seemingly gross stuff a witch might need handy to make a brew, spell, or potion.  My small jars include the following items: 


  • toad slime (green noisy putty)
  • dried crow's blood (red sugar sprinkles)
  • rat (or bat) droppings (chocolate candy drops such as Nestle Buncha Crunch which are bunches of crispy rice dipped in milk chocolate) 
  • spider venom (yellow colored water)

I'm actually thinking of putting chocolate covered bugs or another gross candy in the "rat droppings" jar because my boys keep eating all of the good chocolate "droppings".  They may be in for a very rude awakening when they bite into a crunchy chocolate covered cricket.  Yuck!


Here's the PDF of the labels I created for my jars.  Choose the ones which fit best for your vignette.  I printed my labels on a distressed looking scrapbook paper.  My jars are large glass spice jars (4.5" h x 2.5 " w) that you could easily find Target, World Market, Pier 1 or even IKEA.


I had 5 small books which I covered with a distressed looking scrapbook paper printed with 3 basic "titles" you would find in any witch's library - Brews, Potions, Spells.  Just for fun - I added a couple of extra titles - Latin Incantations for Beginners and Busy Witches Weeknight Brews.


I modified my moss ball topiary to a skull topiary.  I removed the moss ball and replaced it with the foam skull head.  I added a black ribbon up the post and tied a bow under the skull.


I added a simple broom and black witch's hat as a finishing touch.  


Wicked Fun!

Saturday, September 19, 2015

Simple & Spooky Mantle

As I mentioned in my previous post, it's officially fall even though the weather in my neck of the woods isn't cooperating...yet.  Maybe it will cool off a little by the time October rolls around.  Although I don't normally decorate for Halloween, I'm helping with a fundraising event in October which has gotten me in the spirit of the spooky season.  It was way past time for me to update my mantle anyway. Although the layout pretty much stayed the same, I came up with a simple and spooky design just perfect for Halloween.


I needed a clean slate to begin the transformation so I removed the bird art and moss balls that I featured in my Simple Spring Mantle.
  

I added a piece of gauzy fabric across the wooden mantle to give it a creepy texture.  


I replaced the bird art with tile-looking art overplayed with chalk art with the word "spooky".  I created chalk art using the same technique I detailed in a previous post, Framed Glass Chalkboard.  That post gives step by step instructions on how to create any type of word art in chalk. Here are the basics:  

  • print out the words you want in font and size of your choice
  • dry fit words to your chalkboard
  • rub backside of paper with chalk
  • place in position on chalkboard using a little washi tape to hold it in place
  • trace letter design
  • remove paper
  • fill in with chalk pen

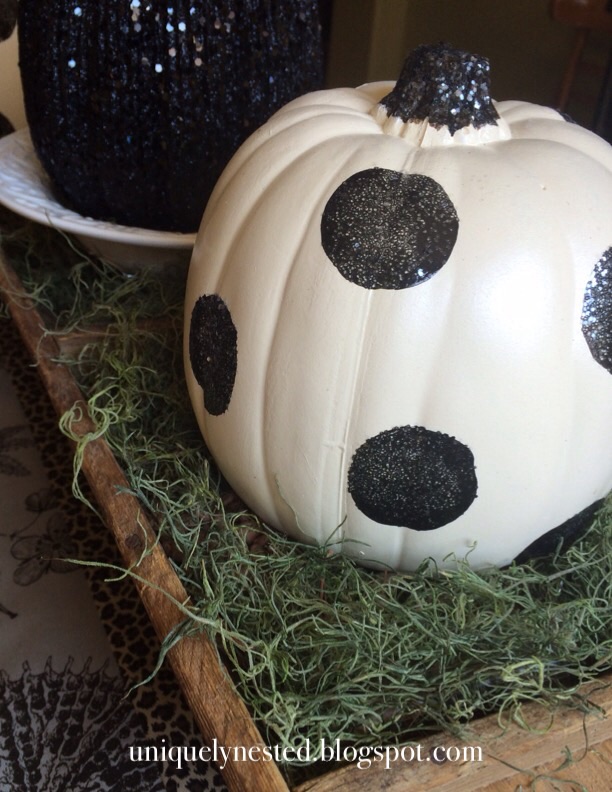
I replaced the moss balls with white pumpkins.  You could leave them as is or you could distress them with burnt umber and black glitter paint.


I placed black glitter branches in front of the art and peeking out around the potted pumpkins.


Lastly, I sat a small skeleton adjacent to the art work.  He's looking toward the television which kinda makes me laugh. He's probably watching football (Go Texans!) or ESPN.  I do live in a house full of boys after all!  

Sources:

Creamy Gauze Fabric - World Market (Halloween area)
Black Glitter Branches - World Market (Halloween area)
Small White Faux Pumpkins - Michael's
Burnt Umber, Black Metallic paints (Folkart Brand) - Michael's
Chalkboard - Michael's
Chalkboard Pen, Chalk - Michael's
Small Black Skeleton - Target

Don't forget to look a discount off coupon for Michael's.  I get weekly emails for both Michael's and Hobby Lobby each week which always includes at least a 40% off coupon.  Sometimes even 50% off.


Have a spooktacular time creating 
your own unique mantle design!


Friday, September 18, 2015

Autumn Door Arrangement

We recently celebrated Labor Day weekend here in the United States which means most people enjoyed a day off on the first Monday of September.  Many people took advantage of the long (and hopefully relaxing) weekend by traveling to the lake or beach, visiting family and friends, and cooking out.  This particular weekend marks for me the official end of summer and the official beginning of autumn (even though the high temperature that day was a sweltering 97 degrees).  Despite the heat, I enjoyed a "labor of love" working along side my mom-in-law making autumn-inspired floral arrangements which can be used to decorate a tabletop or front door.  Maybe it will work like a rain dance and bring cooler temps?  A girl can always dream...


I made the first arrangement in a galvanized floral bucket (which could stand or hang on the door).  This one (below) is going to my sister. 

When I arrived home from the Labor Day weekend, I found a different container that I preferred for my front door.  Since I had a few floral supplies left over, I made another autumn arrangement for my door.


I found this great French-inspired galvanized hanging basket which is flat on the back with a handle at the top.  I loved the shape, color, and distressed finish.  It really stands out against my door.


First things first, I put floral foam inside container.  It was such a tight fit that I didn't even have to glue it in.  But you may need a little hot glue depending on your container.

Next, I added the three sunflowers which are the focus of the arrangement.


The faux berries or tiny crab apple branches came next.  I placed these along the back on each side and in the center.


The fall colored eucalyptus branches were placed next to fill in between berry branches and on either side of the sunflowers.  I added piece of eucalyptus trailing down along the left front.


The mossy green hydrangea was placed along the edge (back and front) to fill in any empty spots.

I added small bird nest on a stem adjacent to the sunflowers.  It gives the arrangement interest, it's kinda quirky, and it makes me happy.


I made a four-looped bow (tying it off with tan pipe cleaner) in a great striped ribbon.  I attached the bow to one of the stems I had trimmed of the flowers.  


I tucked bow into arrangement on the right side at the front.  The eucalyptus on the left and the bow on the right balance each other.


Here's the finished autumn door arrangement.  I like how the color of the distressed container stands out against the door and contrasts nicely with the flowers.  


Happy Fall Ya'll