Friday, June 12, 2015

Artist Printer's Tray Earring Organizer

So my jewelry area - especially earrings - has become a jumbled mess.  Honestly, I probably only wear half of the earrings I own.  I have a monogrammed pendant and a favorite pair of silver loop earrings that I wear the majority of the time.  But there are certain outfits that deserve something more.  Kind of like icing on a cake.   


I decided to sift through my collection of earrings - donating what I no longer wear and organizing what I do wear.  I needed a better way to organize them so I can see my collection at a glance.  For a whopping $5, I came up with a solution in the form of an Artist Printer's Tray while perusing the clearance area at Michael's.
  

Although the sectioned tray is generally found in the scrapbooking area and used to hold small mementos, photos, and embellishments, I repurposed the tray to hold 2-4 earrings per section (depending on style).  Earrings that dangle may need a single section.  One tray could hold up to 20 pairs of earrings (maybe more).   

I started this project by choosing 3 coordinating 12x12 scrapbook papers.


(1) Botanical Collection "My Darling" (Prima Marketing, Inc.)
(2) Righteous Dots (My Mind's Eye)
(3) Wood Plank    

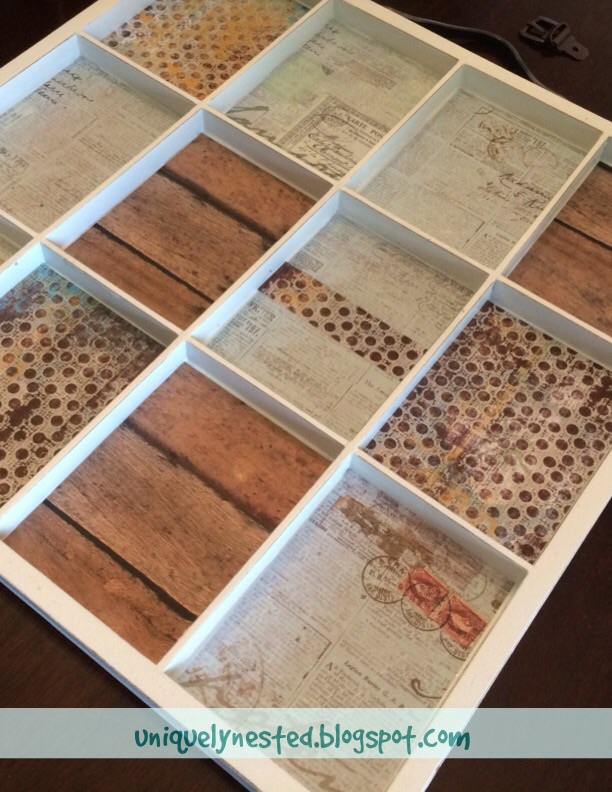
Each section measure approximately 2.75 x 3.75.  I cut 3 pieces each of wood plank paper and dot paper.  I cut the remaining 6 pieces out of the light blue word paper (same paper I used for my kitchen menu board).  Using Mod Podge and a small foam brush, I applied a thin layer of adhesive directly to bottom of each section before placing in paper.  Press paper gently into each section to smooth.   


Here's how the artist printer's tray looks when filled in with the variety of scrapbook papers.


In addition to corks, I chose a variety of unconventional but creative "holders" to organize my earrings - small metal handles, tiny metal knobs (technically called "screw fasteners"), and small metal buckles.  I wanted to be able to get the earrings on and off very easily.  I found these in the scrapbook section at my local Hobby Lobby at 50% off (sweet!).  The handles and knobs are part of the Spare-Parts colletion by The Paper Studio. The metal buckles are by Jim Holtz Ideology.  The corks are from our personal collection but you can also find bags of craft corks.


The picture above shows the unique holders at a glance before adding the earrings.  


This is how it looks after adding a few of my earrings.  I love that the corks hold the stud earrings without having to take the backs off.

  
I added a personalized detail to give the project a unique twist.  


For the buckle, I used a small bit to drill a hole through printer's tray.  Each buckle came with a brad style fastener which went through hole to hold buckle in place.  


The handles are attached with tiny screws not brads.  I made a little boo-boo on my first attempt to attach handle by drilling holes through back of tray before noticing the screws.  Grrr!  Hence, I covered my mistake with the blue strip of paper.  I then screwed the handle onto printer's tray. Important FYI - the screws are a little longer the depth of the tray and I may have screwed the whole thing to my table.  Second oops!  Good thing my table is already a little distressed.  Learn from my mistakes!  :) 


The corks attach easily with a little hot glue.  Stud style earrings fit snuggle into crevice between corks.  


Ta-dah!  Here's my finished earring organizer.  It turned out even better than I imagined.  Check out your local craft store for a printer's tray, scrapbook papers, and interesting holders to make your own unique earring organzier.  Have fun crafting! 

Wednesday, June 10, 2015

Pesto Pasta with Tomatoes and Feta

Looking for a quick summer meal that's simple and fresh? Look no further!  This easy recipe requires six ingredients (seven if you add a grilled protein) and takes less than 20 minutes to prepare. Another plus - each 2oz serving of protein pasta has 10g of protein.      


INGREDIENTS:
- Barilla Protein Plus Penne Pasta (4 servings)
- 6 T, Classico Traditional Basil Pesto (or other prepared pesto)
- 1 pint container grape (or other bite-sized) tomatoes, sliced in half
- 1 small container (~5oz) reduced fat feta cheese
- 1/4 cup, toasted pine nuts
- fresh basil, 8 leaves cut into slivers


DIRECTIONS:
Cook pasta according to package directions.  While pasta cooks, slice tomatoes in half, set aside. Toast pine nuts and cut basil leaves.


Drain penne.  Pour into large pasta bowl.  Stir in pesto.  Add tomatoes and feta.  Gently stir to combine.  Top pasta mixture with pine nuts and basil slivers.  Add grilled shrimp, chicken, or salmon for a heartier meal.  It's delicious both ways.  Makes four servings -  Enjoy!


Sunday, June 7, 2015

Seaside Summer Tablescape

School is officially out for summer.  It's hard for me to believe that I will have one child in high school and another in junior high school next year. High school!  It just doesn't seem possible.  To get my mind off the fact that my kids are growing up way too fast, I decided to restyle my dining room table for summer.                            
    

First things first, I cleared out the antique dough riser except for filler (pinto beans) to create a clean slate.  This is the same base I use for my other seasonal tablescapes.  


I purchased a few items from Michael's - 2 twine wrapped bottles,  2 glass containers with rope handles, 2 bags of decorative sand -  to add to my collection of seashells and candles.


I was on the look out for two unique items for the center sections  that would provide the tallest vertical element.  I popped into World Market yesterday and found a pair of wood carved sea gulls on sale.  I like how one of the gulls is slightly shorter and smaller than the other.  They were the perfect finishing touch to the display.  


Here's how I placed the variety of items in the 8 sections:
- large white candles in the end sections
- twine wrapped bottles next to candles
- larger rope handled glass containers (filled with sand and small candle 
- two wood carved sea gulls in the two center sections (World Market)


I filled in around the candles, bottles, and glass containers with seashells.  Another nice option would be seaglass or driftwood  pieces.  I like the texture of the shells against the wooden base.


You could easily modify this design for a wooden tray or basket.  Chose 3-7 items depending on size of tray/basket to create your own unique table top design.  It looks best (don't ask my why) to keep your design elements in an odd number.  You may already have a few summery items tucked away that would work perfectly for this project.  

Happy Summer!

Thursday, June 4, 2015

Asian Lettuce Wraps

Well the heat is already on down here in Texas and it's only gonna get hotter.  I'm always thinking about light, easy and healthy summertime meals.  Why?  Because it feels like summer here about nine months out of the year.  Not complaining.  I can tolerate the heat and humidity over the cold and endless snow.  Although I do miss the four seasons.  Let me tell you, autumn in North Carolina is gorgeous!  I digress...

So back to the business of making lettuce wraps.  Since I had a variety of veggies on hand - red bell pepper, English cucumber, green onion, carrot - I decided to create my version of lettuce wraps using honey battered chicken.    
  

I happened to have a bag of frozen honey battered chicken breast tenders which my older son loves.  Using the frozen chicken was very convenient but in the future I'd like to make my own honey battered chicken tenders using fresh chicken.


To assemble:  I added two pieces of honey chicken on top of a single lettuce leaf then added a small amount of each veggie plus a little sweet chili sauce.  


Wrap it up and enjoy!  It's messy so have a napkin handy.  


Thursday, May 21, 2015

Confetti Salsa Fresca

Hola amigos!  So it's been a very busy spring in my corner of the world.  My husband and I recently had an amazing opportunity to travel to Puerto Vallarta, Mexico for a romantic weekend away.  It was seriously amazing!!  Did I say that already?  Well, it was that awesome.  Since it's only a 2-hour flight from where we live, we could kick ourselves for not visiting sooner.  A Texas size "muchas gracias" goes out to the staff at the Grand Velas Resort and outdoor adventure crew at Vallarta Adventures who made our stay incredibly enjoyable.      
                      

After a bucket list worthy outdoor adventure of speedboat ride across ocean, mule riding up the mountain, zip-lining through the jungle, and rappelling down a waterfall, we enjoyed a light lunch of quesadillas, guacamole, and salad made by a sweet little lady who didn't speak a lick of English.  Luckily we were able to use our basic Spanish to order our food.  It was perfectly simple and absolutely delicious.  The salad was similar to a fresh salsa like pico de gallo but reminded me of colorful confetti so I named my version Confetti Salsa Fresca.


The vegetables were chopped finely enough (but not too small) so that you could easily scoop up a nice portion on a tortilla chip.  Topping the quesadilla with a little guacamole and the fresh salsa was the perfect combination.  Here's the printable recipe:


The version below is easier to read from blog page if you are ready to try recipe but not ready to print it out.  

Confetti Salsa Fresca
1 Carrot, shredded
1 English cucumber, medium-finely cubed
3 Roma tomatoes, medium-finely cubed
2 Green onions, finely sliced
1 Small lime, juiced
Seasoning: 1 teaspoon Tajin (classico)

Prepare vegetables then add lime juice and seasoning.  Stir to combine.  Serve as a condiment with your favorite Mexican foods or enjoy as a fresh salsa with tortilla chips.


Tajin Clasico is an all-natural mild seasoning blend of chilies, lime juice, and sea salt which is very popular in Mexico.  It's commonly sprinkled on fruits and veggies.  It can also be used to rim the glass for special margaritas or other mixed drinks.  Check it out at tajin.com.  


Plan a night to make a simple Mexican meal and include this yummy Confetti Salsa Fresca.  Don't forget to blend up a pitcher of delicious frozen margaritas.  Salud!


Wednesday, April 22, 2015

Weekly Menu Board

Hey there - have you had a chance to check out the post on my new Kitchen Command Center (KCC)?  The original design included a quick reference folder, a magnetic bin for shopping lists/notepads, and a magnetic bin for our takeout menus folder and family reference folder.  That was actually supposed to be it but I got to thinking....which can sometimes get me into trouble!  But not this time.  My KCC seemed incomplete somehow so I added a menu board to help organize our weekly meal planning.                        
          
There are myriad examples of menu boards on Pinterest so there's bound to be one that will meet your needs.  I wanted something simple, compact, and magnetic.  I already had most supplies on hand including the square linen canvas, ribbon, and several clothespins so that was my jumping off point.  


Here are the supplies I used to create the Weekly Menu Board:

12 x 12 linen or burlap covered canvas

hot glue
ribbon
natural clothespins
scrapbook paper
small black letter stickers 
full sheet label paper
chalkboard tag
small kraft sacks
chalkboard stickers
chalk & chalk pen
super strong magnets (3)


First, I glued the black grosgrain ribbon equal distance from outside edge leaving 2" of canvas showing.  


Before gluing the remaining components (clothespins, chalkboard header, and sacks to hold meal option tags), I did a "dry fit" to make sure I had the spacing right before actually gluing.    


I then created the chalkboard header and chalkboard stickers using the same technique I used in my glass chalkboard post.  I printed off desired words and images. Rubbed back generously with regular chalk.  Placed word or image on front of chalkboard and traced with pen.  I then traced with chalkboard marker, allowed to dry, and then lightly rubbed entire area with chalk.  


I created my meal option tags in my "Pages" app on my iPad using a chart (but skipping every other space).  I printed this off on a full sheet of label paper and cut out each label using my paper cutter.  I also cut out several pieces of scrapbook paper (1" x 4") attaching  meal option labels to each piece.  You could also print directly onto your scrapbook paper.  I also plan to laminate these tags for longevity.    


The addition of the Weekly Menu Board was the finishing touch I was looking for to complete our Kitchen Command Center.  I've already noticed our boys getting more involved choosing meals for the week.  I think it's important to empower kids to make healthy food choices.  What better way than involving them in choosing and preparing meals.  Cooking and eating should be a multisensory experience.  

Shopping for fresh ingredients at your local grocery store, farmer's market, or even picking fresh berries or corn at a local farm can be a fun outing.  As a young girl, I have great memories of picking and shucking fresh corn.  As toddlers, my boys loved visiting our local berry patch and could not resist sampling the yummy produce. 

I hope this post inspires you to create a menu board that will encourage your family  to make meal planning a fun, multisensory experience.  

Monday, April 20, 2015

Kitchen Command Center

I have a dirty messy little secret (and I'm not alone). Based on what I've seen at the homes of family and friends, many of you share my tendency for hanging myriad items on the refrigerator. You know the kind of countless items I'm talking about.  Here's a partial list of things on the side of my frig - photos, children's art, recipes, school info, camp info, group exercise schedule, kid's sports schedules, magnets, graded papers, report cards, magnetic bins, highlighters, business cards, box tops, and a school phone directory.  It's a complete mess!!  I wince and look away each time I glance at it (which is multiple times per day) promising myself I will work on this one of these days.  Well, enough procrastinating!  I am bound and determined to make sense of this cringe-worthy chaos.  Today is the big day...                                           


Wondering just how messy this area was before I got to work organizing everything?


First things first, I removed everything and wiped the area with cleaner.  Nothing like a clean slate... It already looks better!


 I sorted through the mess seemingly important items.  Most items ended up being recycled, shredded, trashed, or relocated because all kinds of "papers" dominated the clutter I removed.  Only a few important papers will come back because I refer to them on a regular basis.  I found the perfect solution to keep papers not only neat but easy to access (and update a needed) - clear front presentation folders with 3-rings brads as well as page protectors.  These are inexpensive and readily available at office supply stores (and even the grocery store).  You may already have something you can use in your stash of school or office supplies.


I attached magnetic strips to back of quick reference folder with hot glue.  I then placed several page protectors in the folder securing with brads.  I printed "Quick Reference" on an 8.5" x 11" piece of scrapbook paper and placed it in first page.  Papers I will include in my quick reference folder will be the group exercise class schedule, school calendar, sports/game schedules, cooking measurements conversion chart, and important phone numbers (for caregivers).  I have additional empty page protectors for any new papers that I deem worthy of the quick reference folder.  My litmus test - if I don't look at a paper on at least a weekly basis it doesn't go in the quick reference folder.

I have one magnetic bin for pre-printed grocery shopping lists and blank note pads.


I have a second magnetic bin for a takeout menus folder and a family reference folder (both folders are same style as quick reference).


Our family folder includes papers that I refer to occasionally (on a biweekly, monthly, or quarterly basis):
School - class schedules for each child, login IDs/passwords for district websites to check grades/assignments, teacher contact info
Sports - roster with contact info 
Church - volunteer schedule/duties, small group contact info
Neighborhood - contact list
Gym/YMCA - family member login and account pin


For most families, the kitchen is the heart of the home.  Since we spend a lot of time in the kitchen area and we have a refrigerator, why not make it a multifunctional appliance. It's a logical place for locating your kitchen command center (preferably on the side).  I seem to do more planning in the kitchen than any other room so it's nice having my shopping list and notepads handy.  I can also quickly peruse my takeout menus on those nights when I don't feel like cooking.  This system is super flexible - if you notice that you are referring to papers in your family folder more often than expected, you can easily move those papers to your quick reference folder.     


This project was a snap and I don't know why I put it off for so long.  It can easily be personalized with different folders and scrapbook paper that coordinates with your decor.  I found my mesh bins (with magnets on back) and chalkboard clips at HomeGoods.  You could likely find everything you need at the dollar store.  I hope this post inspires you to create your own unique kitchen command center.  I feel more productive already!!