Saturday, October 31, 2015

Hard Cider Sangria

Happy Halloween!  I have no tricks up my sleeve today but I do have a treat for you.  Yesterday I made a yummy fall-inspired sangria for a gathering and wanted to share the recipe with you.  This is not a true sangria in the technical sense of the word because my version is not made with wine or brandy.  But my fruit-infused libation calls for hard apple cider, apple-cranberry juice blend and orange liqueur which gives it a sangria-ish quality.  I think it's pretty tasty.  Based on the mostly empty decanter, I think my guests enjoyed it too!  


I'm a big fan of hard cider especially the Angry Orchard brand. The apple ginger flavor is my absolute favorite!  I got to thinking that a "punch" or sangria using this drink would be really good.  When I searched for recipes, I didn't really find anything that appealed to me so I got creative.  Here's what I came up with...

Hard Cider Sangria

1/2 honey crisp apple, cubed (toss with a little lemon juice to keep from browning)
2-3 lemons, sliced
2-3 small oranges, cut into small wedges
1 cup cranberries
1 1/2 cups Grand Marnier, orange liquor
1/4 cup lemon juice
6 cups apple-cranberry juice blend
4 bottles of Angry Orchard hard cider* 

Place fruit in drink decanter.  Pour in remaining ingredients. Stir to blend.  Serve over ice and garnish with oranges, apples, or cranberries.

Makes:  110 oz of sangria or roughly 14 - 8oz servings


*I used these varieties of Angry Orchard hard cider: 3 crisp apple, 1 green apple.  I'm curious to try the cinnamon apple blend.


I hope you'll mix up this wicked easy drink for your next fall gathering.  It's scary good! 


BOO, Y'all!

Monday, October 19, 2015

ENTER if you DARE - Halloween Home Tour

Although my Halloween decorating started in the foyer with a simple pumpkin vignette on my entrance table, I just couldn't stop there.  The decorating continued with a polka dotted pumpkin patch along my adjacent dining room table and migrated into my kitchen, family room, and even the powder room.  Well, you know what they say, "Go big or go home!"  I've got a few ideas for you so it's not too late to get into the "spirit" of things!  Are you ready to take quick tour of our haunted lair?


OUTDOOR ENTRANCE:

Our haunted house begins just outside the entrance to our home with a smiling skeleton and a mischievous crow bidding you welcome along with fall flowers and a cluster of pumpkins.


A small walkway leads to our front porch where another skeleton is hanging out on the door.  Say "hello" to Mr. Bones.  He is decked out in his superhero costume with his candy bag at the ready.  I cut the mask from felt and the cape came from an existing dress up set I already had on hand.


Mr. Bones is flanked by two pots of white mums and more pumpkins.  We will have fun carving these orange pumpkins the weekend before Halloween.


I love how the morning sun is highlighting the pumpkins in this photo.  My porch tends to be very shady in the afternoon so I chose white mums because they stand out more in the shade.


FOYER:

The designs in the foyer and dining include the polka dot pumpkins that I created in September.  It's fun, whimsical, and not too scary.  The theme is black and creamy white with a little glitter bling.  For the entrance table, I created a monogram polka dot pumpkin.  My crow friend sits atop the monogram pumpkin.


I displayed it with a large black glitter pumpkin and a small black glitter pumpkin.  The large pumpkins are elevated on ceramic cake stands in a muddy orange color.  The smaller pumpkin is elevated on a tall orange candle stick.  I added a small chalkboard sign at the top the candlestick that says - Enter if you Dare - which gives all our guests fair warning as they enter our haunted lair.


Here's a wide shot of the entrance table to show the small vignette.  The colors of my existing artwork worked perfectly with my scheme.  I love when a plan comes together!  I purchased this table at IKEA a few years ago and love it!  Each family member has a shoe basket below and small basket at the top.  It keeps us organized (at least some of the time).  


The small trays I normally use to collect sunglasses and keys remained in place.  I added a Halloween ribbon around the candles and place faux bones in the base of each holder.

DINING ROOM:

The black and cream theme continues into the adjacent dining room.  Once again, I've converted my antique dough riser into a unique Halloween display just perfect for the spooky season.  This time around it has become a polka dotted (albeit haunted) pumpkin patch.  


I alternated four polka dot pumpkins along the dough riser sections Two black glitter pumpkins elevated on white stands sit between the polka dot pumpkins.  Green moss in tucked into each section to cover the filler (beans) and to add to the creepy vibe.


I made the center of the display the focal point with two elevated black stands which both hold a foam skull inside an open top.  Small chalkboard signs tell guests to "beware", "turn back now", and that it's a "dead end".  Our guests can't say I didn't give them fair warning!  Three dimensional bats hang from the light fixture to guard the pumpkin patch.


In addition to the dining table, I embellished the existing console table as well.  I covered some books in coordinating scrapbook papers in cream, black, and tan.  The books elevate a ceramic horse head - we call him Mr. Ed - who is sporting a fantastic feathered mask for Halloween and a chevron bow.  


Two mercury glass candlesticks and two large black glitter pumpkins flank the sides.  I added the word - BOO - vertically above the display by taping it to back of existing artwork.


Bats dangle from the light fixture to watch over the haunted pumpkin patch along the dining table.


KITCHEN & FAMILY ROOM:

The witch hat and spider topiaries give the kitchen and family a spooky vibe.  


Additional bats and a chalkboard sign telling you to "Eat-Drink-Be Scary" complete the vignette in the kitchen window.  


A "bewitching" vignette adjacent to the kitchen highlights the space along the top of our piano.  


HALLOWEEN BATHROOM HUMOR:

I just couldn't resist!  What do they say?  Laughter is the best medicine.  I hope this wisdom doesn't exclude bathroom humor.


I live in a house full of boys (with the exception of our doggy daughter) so our bathrooms (especially the downstairs powder room) gets a lot of action and isn't always smelling like a rose...just sayin'.  You MOBs (moms of boys) out there know what I'm talking about!


I added this simple galvanized chalkboard to an easel along with a few embellishments to set the stage.


I hope this tour has given you some ideas for decorating your home for Halloween.  You still have 12 days before the little spooks start knocking at your door!


Mr. Bones says...Happy Haunting!

Monday, October 12, 2015

Bloody Eyeball Cake Bites

In addition to helping organize a fundraiser in October, my family is hosting a Halloweenie Roast.  I wanted to create some fun Halloween themed treats to share with our guests at both of these events.  I found these great eyeball treat toppers.  I have both small and large candy eyes but decided to use the small ones for this recipe.  I thought it'd be awesome to use these on cookies, cupcakes or cake pops.  The cake pops really interested me because it would be like eating an eyeball on a stick.  Gross!


Well, my first attempt at making cake pops was a complete disaster. The sticks would not stay in place and I didn't like how the candy melts tasted.  I decided to give it another go without the sticks and a different icing.  I know my boys will definitely love these because the cake part is strawberry muffin mix which has bits of red inside to mimic blood.  Disgusting but fun, right?  The cream cheese frosting makes them even better!                      


I used the Martha White strawberry muffin mix which made 1 1/2 dozen cake pops.  All you have to do is add milk. 


Directions for Baking
  • I baked my little cakes in the Baby Cakes Cake Pop Maker for 3-4 minutes which worked much better than the NordicWare Cake Pop Pan I used in my first attempt at cake pops.  I sprayed each reservoir with oil before adding 1 tablespoon of batter.  Do not overfill!  The cakes come out perfectly and don't stick to the pan.  
  • Allow cake pops to cool completely before coating in icing.


Directions for Decorating
You have many options for decorating your bloody eyeball cakes depending on what you like.  I'm not a big frosting person so I prefer something light versus heavy.  I like the flavor of cream cheese icing with the strawberry cake.


I attempted to make a quick pour fondant from a recipe I found online but it never thickened so I tossed it.  I substituted a ready-made cream cheese icing in the tub instead.  I heated it up in the microwave for about 15 seconds to melt it.  You could also add a tablespoon of meringue powder to give it a glossy, hard finish.  The icing is light in flavor and white which makes it look eyeball-ish.  Perfect for our creepy Halloween treat!!


Using a fork or preferably the tool which comes with Baby Cakes maker to hold cake underneath, drop cake pop into melted icing or use spoon to covering it completely.  


Allow icing to drip off.  Place on wax paper or cooling rack to allow icing to set.  


After icing glaze sets, use a #3 Wilton icing tip to add a small circle of red frosting and place candy eyeball onto red icing.  


Add squiggly lines of red icing extending from red circle to mimic veins.  Sprinkle with red sugar before white icing sets or after adding red icing if desired. 


Happy Halloween!


Monday, September 28, 2015

A Trio of Halloween Topiary

So the Halloween decorating continues with cute and creepy topiaries.  I've come up with three different options for modifying the topiaries I created in the spring.


Witch Hat Topiary


For Witch Hat Topiary - Simply add a painted and glittered paper mache witch hat to the moss ball and tie a bow around top of distressed clay pot (or under moss ball for tall topiary).


Spidery Topiary
I converted my tall topiaries into spider topiaries by adding 2-3 glow in the dark spiders to the moss ball and ribbon bow just below moss ball.  Super simple!!


Skull Topiary
I removed the moss ball and replaced it with a foam skull (which I found in Halloween area at Michael's).  I wrapped post in black ribbon ending with a bow under skull.  


Friday, September 25, 2015

See-Hear-Speak-No-Evil Pumpkins

I'll admit that I'm going a little overboard with Halloween this year but the ideas just keep coming so I keep going.  I must give my younger son credit for the idea part of this next craft.  He has a book mark with three frogs positioned with their hands over their eyes, ears, and mouth based on the original Japanese pictorial maxim, Three Wise Monkeys.  
The monkeys embody the proverbial principle "see no evil, hear no evil, speak no evil".  So basically the monkeys (or pumpkins in our case) are instructing us to be of good mind, speech, and action.  I think that's pretty good advice.  My son thought it would be cool and funny to showcase pumpkins that way for Halloween.  I couldn't agree more!

Craft Items Needed:
  • 3 faux or real pumpkins (about the same size)
  • 3 faux sticky back mustaches (found mine at Target) or you could draw it directly onto pumpkin with Sharpie marker
  • 3 pairs of google eyes (whatever size you like - I kinda wish I'd used bigger eyes)
  • 3 pairs of bony hands (I used hands from 3 small bag 'o bones I purchased at Michael's in Halloween area)
  • hot glue

Directions:
  • Hot glue eyes and place (or draw) mustaches on pumpkins for "face"

  • See No Evil Pumpkin - hot glue hands as if they are covering the eyes

  • Hear No Evil Pumpkin - hot glue hands on sides of pumpkins as if they are covering invisible ears

  • Speak No Evil Pumpkin - hot glue hands at an angle as if covering the mouth

Place pumpkins together for a funny albeit wise reminder of how we should behave anytime of year but especially at Halloween with all the spooks that are out and about.


Wednesday, September 23, 2015

Polka Dot Pumpkins

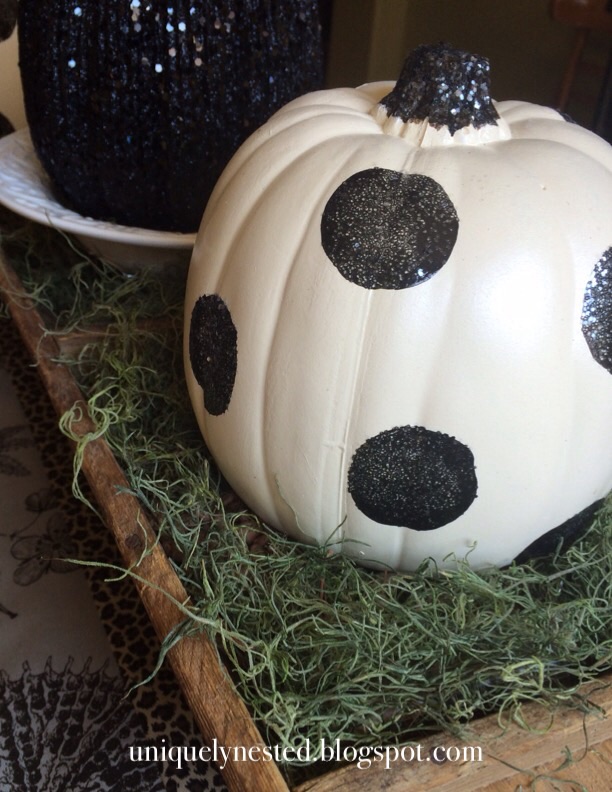
Are you getting into decorating for Halloween as much as me?  I'm in the process of creating displays for both my entry table and adjacent dining room.  Can you guess what the highlight of both areas is?  It's sparkly and spotted but you won't find in nature.  It's Polka Dot Pumpkins!


I purchased a few small faux cream-colored pumpkins at Michael's and decided to try my hand as creating polka dots for a fun and whimsical design.  You can find faux pumpkins at any craft store.  You may even have faux pumpkins left over from last year which you could paint the base cream color before adding the polka dots.  I decided on a black and cream theme (with pops of orange) for these areas so black polka dots were an obvious choice.  Because I have solid black glitter pumpkins which go with the polka dot pumpkins, I made my dots glittery as well.


Here's how to get your polka dot on:

BEFORE 
  • Pour a little bit of black paint onto a small paper plate.  Using a foam pouncer (from Martha Stewart crafts), dip evenly into paint and press onto pumpkin.  Lift pouncer and check that dot is covered fully with enough paint.
  • Gently sprinkle wet paint with course glitter (Martha Stewart crafts) in crystal.  Tap to remove any excess glitter.  I did this step over large baking sheet to collect glitter.
  • Continue to randomly place painted polka dots around pumpkin and adding glitter as you go.  You can probably do up to 3 dots at a time before adding glitter but you don't want paint to dry too much before adding glitter.
  • Be careful where you put your fingers as you place dots.  It gets a little tricky as you continue to add dots.  You don't want to smudge previously painted dots.  If this happens (which it did to me a few times - grrr), just get a damp paper towel and wipe off your mistake.  Replace dot you removed with a new smudge-free glitter dot.
  • Last but not least - paint stem with black paint and add glitter.  Let the painted polka dots dry.  


This project is very forgiving.  If you mess up or smudge a dot, just wipe if off and start over.


Monogrammed Version:
  • IMPORTANT - Start with monogram first if you are choosing this style polka dot pumpkin.
  • I placed a large lower case sticker onto pumpkin.  I did not add any additional heavy duty adhesive to sticker back but would consider it for next time.  I noticed the edges seemed to come up a little because of the curve of the pumpkin which bothered me.  I'm a little OCD that way :-/
  • Carefully paint letter with Mod Podge.  Sprinkle with course glitter.  I used the smallest foam pouncer (which is just a little larger than a pencil eraser) to place a dot on either side of letter.  It gives the letter definition.
  • Begin placing dots as described above.  

Here's a sneak peek (pictures below) of a polka dot pumpkin on my entry way table and dining table.  That's all on that for now... look for an upcoming post so you can see finished design.


This simple (yet spooktacular) craft is incredibly easy, a little messy (you know how glitter gets everywhere) but oh so eye-catching and impactful for a Halloween design.  I hope you'll give it a try.  I'm actually thinking of making a few more painted pumpkins with orange dots (for general fall decor/Thanksgiving) as well as striped ones in black or orange.  You could even paint on just the Mod Podge in dots or stripes and cover in a clear glitter (for a tone on tone look) or colored glitter to give it a pop.


The Polka Dot Pumpkins only require only 4 items (which you may already have on hand) - faux pumpkins, black craft paint, foam pouncer set and course glitter.  I currently have them in my entry way, dining room, and one in my powder room (more on that later).  I'm thinking of creating a few more for my kitchen island and window.  Where will you put your Polka Dot Pumpkins?